lundi 10 juin 2013

Connecting a bluetooth mate to a Lilypad Arduino

I've been searching for some clear tutorial on how to connect a Sparkfun Bluetooth Mate and a Lilypad Arduino. Gladly, I haven't found it, so i'm posting one here. Hopefully this will be useful for those working with bluetooth and wearable projects.

This tutorial is based on Rio Akasaka's tutorial on how to set up the the arduino pro mini and the bluetooth mate on a Mac, which is based on Jonathan Warren's tutorial on setting up the arduino mini pro and the bluetooth mate on a P.C.. I also used parts of code coming from the Sparkfun bluetooth tutorial.

I'm using:
1 Lilypad Arduino (atmega 328)
1 FTDI basic breakout
1 Bluetooh mate Gold (though Silver should work just as well)

NOTE THAT: bluetooth mate Gold and Silver from Sparkfun are made to work with the Lilypad: pins TX and RX are inverted on these boards (not the same as with the other boards).


I soldered the bluetooth pins so the lilypad and the bluetooth could lay horizontal when connected to each other.


I then connected the FTDI to the Lilypad so I could upload the initial test program Jonathan Warren wrote.
(select tools>Board> Lilypad Atmega 328)


/***********************
 Bluetooth test program
***********************/

int counter = 0;
int incomingByte;

void setup() {
  Serial.begin(115200);
}

void loop() {
  // see if there's incoming serial data:
  if (Serial.available() > 0) {
    // read the oldest byte in the serial buffer:
    incomingByte = Serial.read();
    // if it's a capital R, reset the counter
    if (incomingByte == 'R') {
      Serial.println("RESET");
      counter=0;
    }
  }
  
  Serial.println(counter);
  counter++;
  
  delay(250);
}


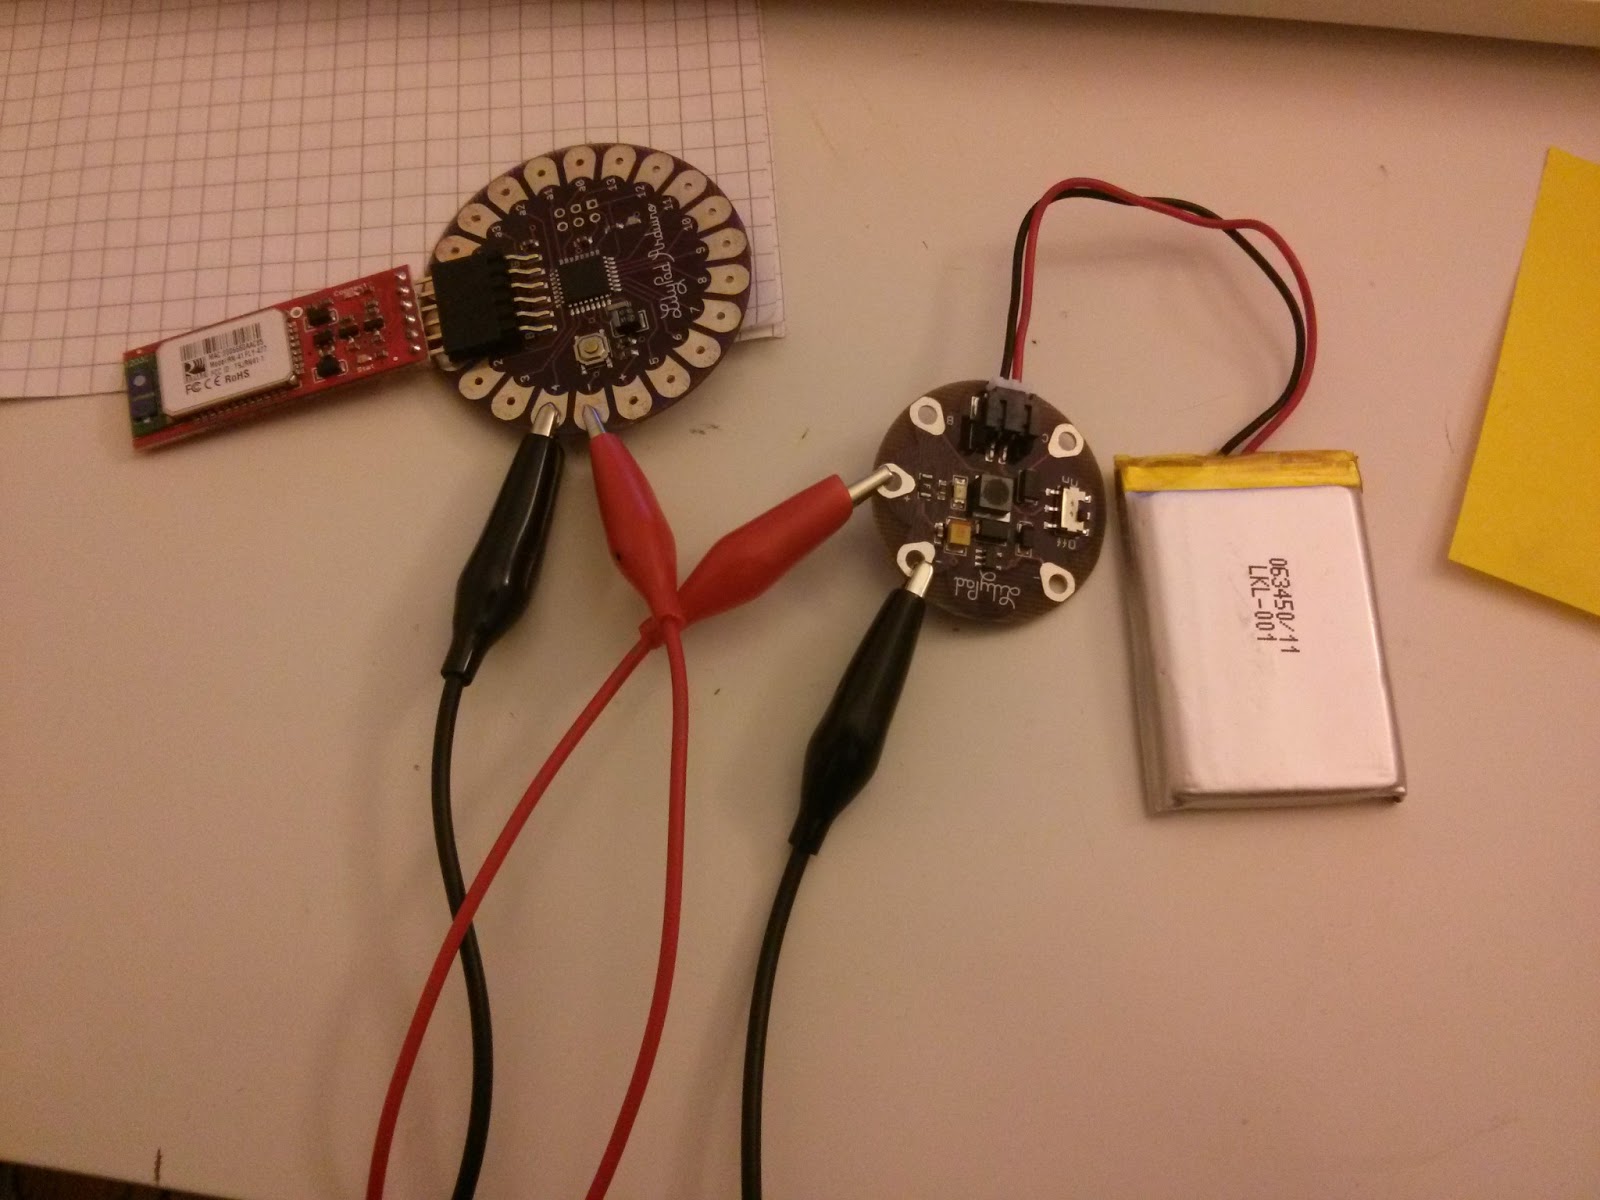
After  uploading the program to the Lilypad, I disconnected the FTDI and connected the arduino to the LiPower and battery, and to the bluetooth mate module.


I then launched the Bluetooth assistant on my Mac, and followed the steps Akasaka described on his tutorial. Basically: 

- opening the bluetooth preferences
- turning on the bluetooth; 
- clicking on the + button; 
- looking for bluetooth devices; 
- selecting my bluetooth mate (probably a m.a.c address or a "FireFly this" or a "RN42 that"); 

- pairing with it (password is 1234 by default);  this adds the bluetooth mate to my bluetooth devices list; 
- I then select it on the list and then I click on the wheel, right next to the + button, to open more options; 
- then click on "Edit serial ports": this actually makes the computer connect to my bluetooth mate (haven't actually figured out why but it does).


After that I returned to the Arduino program on my computer and go to:

- Tools > Serial Port > and select  dev/tty/*name of the bluetooth mate*
- then i open the serial monitor and voila..  numbers show up...
- Hit the R key and it starts counting from 0..


Remember: in order for this to work, your computer must be connected to the bluetooth mate, via the bluetooth assistant on your system preferences: selecting the mate from the list of devices and clicking on Edit serial ports... that does the trick...dunno why..


I tested sending letters and stuff just for fun, and it works fine (no strange characters like ÿâ or such)


I then wondered how I could go into Command mode and change some parameters on the bluetooth, like the name, password. Turns out it was pretty simple.

I changed the code a bit, and reuploaded it with the FTDI breakout to the Lilypad: 


/***********************
 Bluetooth test program
***********************/
int incomingByte;

void setup() {
  Serial.begin(115200);
  // print $$$ so the bluetooth enters command mode
  Serial.print($$$);
  // necessary delay
 delay(2000);
}
void loop() {
  // see if there's incoming serial data:
  if (Serial.available() > 0) {
    // read the oldest byte in the serial buffer:
    incomingByte = Serial.read();
    // transform bytes into characters so I can read them, and print it through the bluetooth serial
    Serial.print((char)incomingByte);
  }
  delay(250);
}

This actually allows me to open the serial monitor and send stuff to the Lilypad, which the bluetooth reads. 
Re-opened the bluetooth assistant on the mac.. selected the mate from the list, and clicked on Edit serial ports (yeah i have to do it every single time..); connection established.
Opened the serial monitor on the arduino (dev/tty/*bluetooth mate name*) 
Entered $$$ on the serial monitor (with No line Ending selected at the bottom of the serial monitor) and the bluetooth answered 'CMD' which means it went into command mode.
Entered D (with Newline selected from the bottom of the serial monitor) for basic settings, O for other settings .. (the entire list of commands can be found on Sparkfun: https://www.sparkfun.com/datasheets/Wireless/Bluetooth/rn-bluetooth-um.pdf)

And that is how I changed my bluetooth mate name from *FireFly this* to Papaye!


lundi 27 mai 2013

Mag3110 Arduino example code sparkfun edited

send() and receive() are now write() and read(); + added comment on pins where things have to go on the arduino


/*
  MAG3110 Breakout Example Code
 
  by: Aaron Weiss, aaron at sparkfun dot com
      SparkFun Electronics 2011
  date: 9/6/11
  license: beerware, if you use this code and happen to meet me, you
           can by me a beer

  The code reads the raw 16-bit x, y, and z values and prints them
  out. This sketch does not use the INT1 pin, nor does it poll for
  new data.

Arduino uno: A4 (SDA), A5 (SCL)
Arduino mega: 20 (SDA), 21 (SCL)
Leonardo: 2 (SDA), 3 (SCL)
Arduino due: Due: 20 (SDA), 21 (SCL), SDA1, SCL1

*/

#include <Wire.h>

#define MAG_ADDR  0x0E //7-bit address for the MAG3110, doesn't change

void setup()
{
  Wire.begin();        // join i2c bus (address optional for master)
  Serial.begin(9600);  // start serial for output
  config();            // turn the MAG3110 on
}

void loop()
{
  print_values();
  delay(5);
}

void config(void)
{
  Wire.beginTransmission(MAG_ADDR); // transmit to device 0x0E
  Wire.write(0x11);              // cntrl register2
  Wire.write(0x80);              // send 0x80, enable auto resets
  Wire.endTransmission();       // stop transmitting
 
  delay(15);
 
  Wire.beginTransmission(MAG_ADDR); // transmit to device 0x0E
  Wire.write(0x10);              // cntrl register1
  Wire.write(1);                 // send 0x01, active mode
  Wire.endTransmission();       // stop transmitting
}

void print_values(void)
{
  Serial.print("x=");
  Serial.print(readx());
  Serial.print(",");
  Serial.print("y=");  
  Serial.print(ready());
  Serial.print(",");      
  Serial.print("z=");  
  Serial.println(readz());    
}

int readx(void)
{
  int xl, xh;  //define the MSB and LSB
 
  Wire.beginTransmission(MAG_ADDR); // transmit to device 0x0E
  Wire.write(0x01);              // x MSB reg
  Wire.endTransmission();       // stop transmitting

  delayMicroseconds(2); //needs at least 1.3us free time between start and stop
 
  Wire.requestFrom(MAG_ADDR, 1); // request 1 byte
  while(Wire.available())    // slave may send less than requested
  {
    xh = Wire.read(); // receive the byte
  }
 
  delayMicroseconds(2); //needs at least 1.3us free time between start and stop
 
  Wire.beginTransmission(MAG_ADDR); // transmit to device 0x0E
  Wire.write(0x02);              // x LSB reg
  Wire.endTransmission();       // stop transmitting

  delayMicroseconds(2); //needs at least 1.3us free time between start and stop
 
  Wire.requestFrom(MAG_ADDR, 1); // request 1 byte
  while(Wire.available())    // slave may send less than requested
  {
    xl = Wire.read(); // receive the byte
  }
 
  int xout = (xl|(xh << 8)); //concatenate the MSB and LSB
  return xout;
}

int ready(void)
{
  int yl, yh;  //define the MSB and LSB
 
  Wire.beginTransmission(MAG_ADDR); // transmit to device 0x0E
  Wire.write(0x03);              // y MSB reg
  Wire.endTransmission();       // stop transmitting

  delayMicroseconds(2); //needs at least 1.3us free time between start and stop
 
  Wire.requestFrom(MAG_ADDR, 1); // request 1 byte
  while(Wire.available())    // slave may send less than requested
  {
    yh = Wire.read(); // receive the byte
  }
 
  delayMicroseconds(2); //needs at least 1.3us free time between start and stop
 
  Wire.beginTransmission(MAG_ADDR); // transmit to device 0x0E
  Wire.write(0x04);              // y LSB reg
  Wire.endTransmission();       // stop transmitting

  delayMicroseconds(2); //needs at least 1.3us free time between start and stop
 
  Wire.requestFrom(MAG_ADDR, 1); // request 1 byte
  while(Wire.available())    // slave may send less than requested
  {
    yl = Wire.read(); // receive the byte
  }
 
  int yout = (yl|(yh << 8)); //concatenate the MSB and LSB
  return yout;
}

int readz(void)
{
  int zl, zh;  //define the MSB and LSB
 
  Wire.beginTransmission(MAG_ADDR); // transmit to device 0x0E
  Wire.write(0x05);              // z MSB reg
  Wire.endTransmission();       // stop transmitting

  delayMicroseconds(2); //needs at least 1.3us free time between start and stop
 
  Wire.requestFrom(MAG_ADDR, 1); // request 1 byte
  while(Wire.available())    // slave may send less than requested
  {
    zh = Wire.read(); // receive the byte
  }
 
  delayMicroseconds(2); //needs at least 1.3us free time between start and stop
 
  Wire.beginTransmission(MAG_ADDR); // transmit to device 0x0E
  Wire.write(0x06);              // z LSB reg
  Wire.endTransmission();       // stop transmitting

  delayMicroseconds(2); //needs at least 1.3us free time between start and stop
 
  Wire.requestFrom(MAG_ADDR, 1); // request 1 byte
  while(Wire.available())    // slave may send less than requested
  {
    zl = Wire.read(); // receive the byte
  }
 
  int zout = (zl|(zh << 8)); //concatenate the MSB and LSB
  return zout;
}

mardi 24 avril 2012

AsyncLabs WiShield Library problems solving 04/2012


AsyncLabs WiShield 2.0 with arduino Uno (rev3, atmega 328)
Troubleshooting : (i thoughy i could write about this in a blog, this way ... well firstly i won't forget about it, ... and secondly it will hopefully help others)

In file included from SimpleClient.cpp:6:
/Users/..../Arduino/libraries/asynclabsWiShield/WiServer.h:198: error: conflicting return type specified for 'virtual void Server::write(uint8_t)'

/Users/..../Arduino.app/Contents/Resources/Java/hardware/arduino/cores/arduino/Print.h:48: error:   overriding 'virtual size_t Print::write(uint8_t)'

SimpleClient.pde:-1: error: 'GETrequest' does not name a type
SimpleClient.cpp: In function 'void setup()':
SimpleClient.pde:-1: error: 'getWeather' was not declared in this scope
SimpleClient.cpp: In function 'void loop()':
SimpleClient.pde:-1: error: 'getWeather' was not declared in this scope

Ok so, i'm having a rough time here. lots of problems.
Gonna go step by step. So first: The two conflicts concerning the write(uint8_t) function.
Problem concerns the AsyncLabs WiShield library (2009, so a bit rusty), more specifically WiServer.h and Print.h

http://arduino.cc/forum/index.php/topic,101354.0.html  (forum about this matter, thanks PaulS, real life saver)

Since Print.h cannot be modified (Arduino Core), we will only be able to modify the WiServer.h file as follows (copied from the forum):

      virtual void write(uint8_t);  ==>       virtual size_t write(uint8_t);

Then, you'll need to change the implementation of the write() function in the cpp file, changing void write to size_t write AND adding a return statement to the write method.

So... in the WiServer.cpp file (took me some time to figure it out):
Function                              void Server::write(uint8_t b)
has to be replaced by           size_t Server::write(uint8_t b)
please correct me if i'm wrong..

Woooot, this error no longer shows----

 ok so Second part of my problem, the "   'GETrequest' does not name a type  " thing:
Problem concerns the library: the apps-conf.h file
in section:

//Here we include the header file for the application(s) we use in our project.
#define APP_WEBSERVER
//#define APP_WEBCLIENT
//#define APP_SOCKAPP
//#define APP_UDPAPP
//#define APP_WISERVER

Since i want to load the SimpleClient example from the library i have to adjust this:
comment ( // ) WEBSERVER  and remove comment from ( // )WISERVER as follows:

//#define APP_WEBSERVER
//#define APP_WEBCLIENT
//#define APP_SOCKAPP
//#define APP_UDPAPP
#define APP_WISERVER


Woooot, problem solved ----

Ok now i have a new problem:
Error compiling

/Users/..../Arduino/libraries/asynclabsWiShieldModified/clock-arch.c:44:20: error. wiring.h: No such file or directory


There seems to be a missing file.
Arduino.cc forums are really great:


answers point to replacing:     (files probably changed since 2009..)

#include "wiring.h"
with:
#include "Arduino.h"

and replaced:
#include "WProgram.h"
with:
#include "Arduino.h"

The proper solution is to edit the library, and change WProgram.h to Arduino.h.


So, in the Asynclabs Wishield library, i modified the clock-arch.c file as shown bellow:
Replacing             #include wiring.h            with             #include Arduino.h

And now i have a new problem:
Error compiling

/Users/..../Arduino/libraries/asynclabsWiShieldModified/WiServer.cpp:38:22: error: WProgram.h: No such file or directory

should have guessed this from the forum... 
it also shows a huge amount of errors, that come from this first error log (cannot find variables and functions and stuff)

So, within the library, in file WiServer.cpp i'm replacing:
    WProgram.h      with     Arduino.h

And again, a new problem arises:

Error compiling

/Users/..../Arduino/libraries/asynclabsWiShieldModified/WiShield.cpp:46:22: error: WProgram.h: No such file or directory 

It's the same problem as with the WiServer.cpp file, so i'm just gonna replace 
     WProgram.h     with     Arduino.h         in the WiShield.cpp file,
it also shows some logs of error that are linked to this first error (as before, not finding variables and functions and stuff)

Woot, no more error logs :D
Done compiling

Binary sketch size: 15550 bytes (of a 32256 byte maximum)


(SimpleClient example)